
Choosing the Right Basement Insulation for Moisture Control
Table of Contents
- Diagnose Your Basement Moisture Before Insulating
- Best Insulation for Basement Walls: Material Comparison
- Basement Insulation R-Value: Meeting Code and Climate Requirements
- Basement Vapor Barrier: Placement and Selection
- Rigid Foam Insulation for Basement Walls: Installation Sequence
- Avoid Common Installation Mistakes
- Next Steps: Planning Your Basement Insulation Project
- Frequently Asked Questions
Last Updated: October 20, 2026
Diagnose Your Basement Moisture Before Insulating
Before choosing the right basement insulation for moisture control, understand where water is coming from. Water enters basements three ways: liquid intrusion (groundwater through cracks or poor drainage), vapor diffusion through concrete, and condensation when warm, humid air hits cold surfaces.
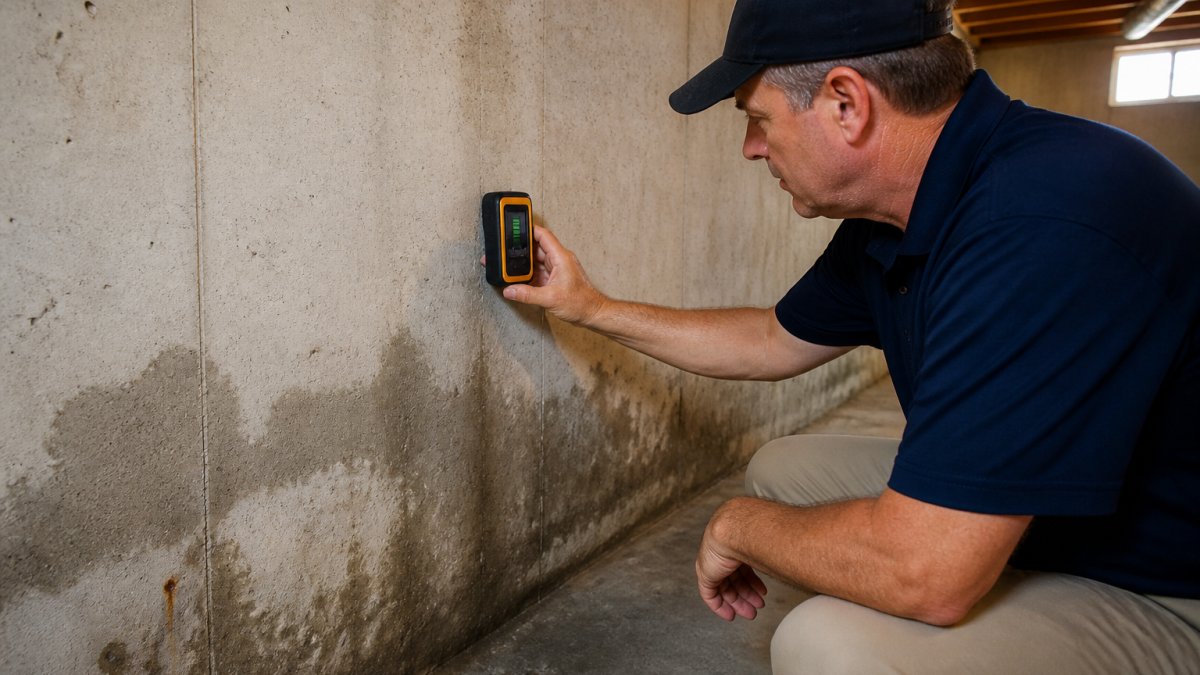
Identifying water intrusion sources
Walk your basement carefully. Look for efflorescence (white mineral deposits), dark stains, foundation cracks, pooling water, musty odors or mold, and peeling paint or wet insulation. Check outside too: is the ground sloping away from your foundation, and are gutters and downspouts draining well away from the house?
Measuring moisture levels
Use a moisture meter (under $100) for hard numbers. Concrete typically reads 12-16% when dry; above 20% means you have a moisture problem. Test multiple spots and map where moisture is highest, that shows where water is entering.
If moisture comes from outside, fix drainage before insulating; if it’s vapor or condensation, your insulation strategy changes.
Best Insulation for Basement Walls: Material Comparison
Choosing the right basement insulation for moisture control means understanding your material options. Each handles moisture differently, with trade-offs in cost, performance, and installation. The three main choices are rigid foam board, closed-cell spray foam, and mineral wool; your climate, moisture source, and budget guide the pick.
Rigid foam board insulation
Rigid foam boards (polyisocyanurate or extruded polystyrene) resist moisture and don’t absorb water, creating a continuous thermal barrier that works well with a vapor barrier on top. The main drawbacks are higher cost per square foot than fiberglass and seams that must be sealed carefully, since poor sealing defeats the whole system.
Best for: Basements with moderate moisture and tight budgets for DIY installation.
Closed-cell spray foam
Closed-cell spray foam is applied wet, expands to fill every gap, and cures into a solid, waterproof barrier that seals air leaks and resists moisture. The downside is cost and complexity: trained contractors, expensive material, and permanence. It can also trap moisture if your vapor control strategy is wrong.
Best for: Homeowners willing to invest in professional installation for superior thermal performance.
Mineral wool and fiberglass
Mineral wool and fiberglass batts are the cheapest, DIY-friendly option, but they absorb water. In a damp basement they fail quickly, holding moisture, compressing, and losing R-value. They work only in dry basements or where moisture problems are fully solved, never as your primary moisture-control layer.
Best for: Secondary insulation in dry basements or above a moisture barrier.
| Material | Moisture Resistance | R-Value per Inch | Cost | Installation |
|---|---|---|---|---|
| Rigid foam board | Excellent | 4-5 | Moderate | DIY-friendly |
| Closed-cell spray foam | Excellent | 6.5-7 | High | Professional required |
| Mineral wool | Poor | 3-4 | Low | DIY-friendly |
| Fiberglass | Poor | 3.2-3.8 | Low | DIY-friendly |
Basement Insulation R-Value: Meeting Code and Climate Requirements
R-value measures thermal resistance, and the R-value you need depends on your climate zone and local building code. Choosing the right basement insulation for moisture control includes meeting minimum R-value standards to keep your basement warm and heating bills reasonable.
R-value standards by climate zone
Canadian building codes set minimum R-values for basement walls. The National Building Code of Canada (NBC) is a model code provinces adopt or adapt, and your local authority having jurisdiction (AHJ) determines what applies to your home. Colder climates need higher R-values; as a general guide, colder regions may require R-20 or higher for the above-grade portion of the wall, while milder areas may meet code with lower values.
Navigating the code and your AHJ
The NBC is not law until adopted by a province or territory, and some provinces publish their own codes with specific insulation tables. Your AHJ, often a municipal building department, interprets and enforces it. Before you insulate:
- Confirm which code edition your province or territory has adopted.
- Obtain the specific minimum R-value for basement walls in your climate zone.
- Ask whether the requirement applies to the whole wall assembly or just the insulation.
- Check if there are prescriptive or performance compliance paths; some codes allow trade-offs.
Ask your AHJ for the exact clause or table they use for basement wall insulation. This removes guesswork and ensures your project passes inspection.
R-value per inch and material thickness
R-value per inch tells you how much thickness you need. For R-20, rigid foam at 4-5 per inch needs roughly 4 to 5 inches; spray foam at 6.5-7 per inch needs roughly 3 inches. Thicker insulation eats basement space, so spray foam’s efficiency saves room but costs more upfront.
Beyond R-value: other code and performance considerations
Meeting minimum R-value is necessary but not sufficient. Codes also address air sealing, vapor control, and fire safety. Foam plastic insulation may require a thermal barrier such as drywall, and products carry specific flame-spread and smoke-developed ratings.
National Building Code of Canada
Check your code. Install what’s required. The long-term savings in heating costs pay for the extra insulation thickness.
Basement Vapor Barrier: Placement and Selection
A vapor barrier or vapor retarder controls water vapor movement; they are not the same thing, and the difference matters. Choosing the right basement insulation for moisture control requires understanding vapor control strategy; get it wrong and moisture gets trapped inside your walls, causing decay.
Vapor retarders versus vapor barriers
A vapor barrier blocks water vapor almost completely. It’s typically a plastic sheet (polyethylene) with very low permeability, measured in perm ratings. A vapor retarder slows vapor movement but allows some through. It’s often kraft paper, a smart membrane, or a paint coating.
The choice depends on climate and assembly.
Assembly-specific vapor control strategies
Your basement assembly, the layers of material from inside to outside, determines vapor strategy. A typical basement wall assembly looks like this:
- Interior finish (drywall)
- Insulation (rigid foam, spray foam, or batts)
- Vapor retarder or barrier
- Concrete wall
In cold climates, place a vapor retarder between the insulation and the concrete wall to keep interior moisture out of the cold concrete; in moderate climates, use a more permeable retarder or none, allowing the wall to dry. If liquid water is entering from outside, no vapor barrier will save you; fix the water entry first, then choose vapor control based on climate and assembly.
Climate-zone and wall-material interactions
Vapor control is not one-size-fits-all. The National Building Code of Canada divides the country into climate zones, and its objective-based provisions allow different strategies by heating degree days and wall assembly.
Wall material matters too. Concrete block is more porous and can wick moisture from the footing, often needing a drainage plane and a vapor retarder that allows some drying.
Never install a polyethylene vapor barrier on the cold side of the insulation or directly against a damp concrete wall. This creates a moisture trap and can lead to mold behind the insulation.
Drying potential and the moisture sandwich
The goal is not to block all vapor but to manage it so the assembly can dry. A moisture sandwich occurs when low-permeance materials sit on both sides of a moisture-sensitive layer, such as fiberglass batts; vapor that enters cannot escape and condenses.
Rigid foam and closed-cell spray foam are vapor-resistant and can serve as the vapor retarder when seams are sealed.
Practical selection checklist
- Identify your climate zone and the corresponding vapor-control requirement from the National Building Code of Canada or your provincial code.
- Determine whether your insulation is vapor-resistant (rigid foam, closed-cell spray foam) or vapor-permeable (fiberglass, mineral wool).
- If vapor-resistant, seal all seams and use it as the vapor retarder; do not add a second vapor barrier.
- If vapor-permeable, install a vapor retarder on the warm side (interior) in cold climates, and consider a smart retarder in mixed climates.
- Ensure the assembly can dry in at least one direction; avoid low-permeance materials on both sides of permeable insulation.
National Building Code of Canada
If liquid water is entering from outside, no vapor barrier will save you. Fix the water entry first. Then choose your vapor control based on climate and assembly.
Rigid Foam Insulation for Basement Walls: Installation Sequence
Installing rigid foam properly is the difference between a system that works and one that fails. Moisture leaks through bad seams. Air leaks around poor fastening. Both destroy performance.
Surface preparation and air sealing
Start with a clean, dry concrete wall. Remove any loose paint, efflorescence, or debris. Fill large cracks with concrete caulk or foam.
Once the wall is sealed, apply a compatible foam-safe adhesive to the back of each panel in a grid pattern; poor adhesion means panels can separate over time.
Fastening and sealing joints
Once all panels are in place, seal every seam; this is where most installations fail.
Pay special attention to seams where panels meet the floor and ceiling; that’s where air leaks happen. A sealed joint is the difference between R-20 and R-12 performance.
Avoid Common Installation Mistakes
Most basement insulation failures trace back to three preventable mistakes. Avoid these and your system will perform for decades.
Skipping air sealing
Many homeowners install insulation but neglect air sealing, leaving gaps around the perimeter, at rim joists, and around pipes and ducts. Air moves through these gaps, bypassing your insulation entirely: R-value drops, moisture-laden air condenses on cold surfaces, and over time you get mold and decay.
Spend time sealing. Caulk, foam, gasket tape, and careful fastening aren’t optional; they’re the foundation of a working system.
Choosing insulation before fixing water entry
This is the biggest mistake: homeowners see water stains, panic, and insulate immediately, trapping moisture inside the wall assembly.
If liquid water is entering your basement, fix drainage and waterproofing first, then insulate. It takes longer and costs more upfront, but it works.
Undersizing R-value for your climate
Some homeowners choose thickness based on cost alone, installing R-10 when code requires R-20. The basement stays cold, energy bills stay high, and resale value suffers.
Check your code. Install what’s required. The long-term savings in heating costs pay for the extra insulation thickness.
Next Steps: Planning Your Basement Insulation Project
Choosing the right basement insulation for moisture control starts with diagnosis. Test your moisture levels.
Install carefully. Seal every seam. Fasten properly. Get your vapor control strategy right for your climate and assembly.
If this feels overwhelming, reach out. Mario Laflamme Contracting & Renovation Ltd helps homeowners navigate basement insulation decisions.
Frequently Asked Questions
Should I fix basement water problems before insulating?
Yes. Insulating over active water intrusion traps moisture behind the insulation, leading to mold, rot, and material failure. Identify and seal the water source first, whether that’s foundation cracks, poor grading, or drainage issues. Once the basement stays dry for at least one season, you can proceed with insulation. Rushing this step will compromise both the insulation and the structural integrity of your walls.
What R-value should I use in my basement?
Basement insulation R-value depends on your climate zone. Most basements in moderate climates require R-10 to R-21 for walls; colder regions may need R-21 or higher. Check your local building code or consult with a contractor familiar with your area’s requirements. Remember that R-value per inch varies by material; closed-cell spray foam delivers higher R-value in less thickness than rigid foam or fiberglass, which matters in tight spaces.
What is the best moisture barrier for basement walls?
The best barrier depends on your wall assembly and moisture profile. For below-grade concrete walls, a vapor retarder (6-mil polyethylene or kraft paper) placed on the interior side of insulation prevents condensation without trapping water. In high-moisture basements, closed-cell spray foam acts as both insulation and barrier. Rigid foam with taped seams also resists moisture well. Consult your insulation manufacturer’s guidance for your specific material and climate.
Can basement insulation prevent mold and moisture?
Insulation alone cannot prevent mold if moisture is already present or entering the space. However, proper insulation with correct vapor control reduces condensation on cold walls, which discourages mold growth. The key is addressing the moisture source first, then installing insulation with appropriate vapor barriers and air sealing to maintain a dry, stable environment. Combined with good drainage and ventilation, insulation supports long-term mold prevention.
Basement insulation is an investment in comfort, energy efficiency, and long-term home health. Get the moisture diagnosis right. Choose materials that resist water. Install with precision. Your basement will stay dry, warm, and problem-free for decades to come. Contact Mario Laflamme Contracting & Renovation Ltd today to discuss your project and receive a free consultation on choosing the right approach for your home.

Table of Contents
1. Optimize Your Small Kitchen Layout Ideas for Better FlowGalley Layouts for Narrow SpacesL-Shaped ConfigurationsSingle-Wall…

Table of Contents
Refinish or Paint Existing Cabinets Instead of Replacing ThemReplace Cabinet Doors and Hardware Rather Than Full Cabinet…