
How to Finish Basement With Obstructions
Table of Contents
- Plan Your Layout Around Obstructions
- Basement Framing Around HVAC Ducts
- How to Box in Basement Support Posts
- Managing Plumbing and Gas Lines
- Building Code Requirements for Basement Renovations
- Insulation, Vapor Barriers, and Moisture Control
- Drywall Installation and Access Panels
- Common Mistakes to Avoid
- Frequently Asked Questions
Last Updated: August 31, 2026
Finishing a basement with obstructions is one of the most common challenges homeowners face when expanding their living space. Pipes, ducts, support columns, and gas lines don’t have to stop you from creating a polished, functional basement. The key is planning your layout strategically and understanding how to frame, insulate, and finish around these permanent fixtures.
With the right approach, obstructions become manageable constraints that improve your final design. Below, we’ll walk you through exactly how to finish basement with obstructions so you maximize usable space and maintain code compliance.
Plan Your Layout Around Obstructions
Before you frame a single wall, identify every obstruction: HVAC ductwork, plumbing stacks, electrical conduit, support columns, gas lines, and structural beams. Measure their locations, sizes, and clearances from walls and ceiling.
Document everything on a floor plan, marking obstruction locations, ceiling height at different points, and ductwork direction. This is essential for getting accurate contractor quotes and pulling permits.
A common mistake is assuming all obstructions need to be boxed in. Sometimes the smartest move is designing around them. A support column can become an architectural feature when wrapped cleanly. Running a soffit along the ceiling to conceal ductwork often looks intentional and professional. Consider traffic flow and furniture placement, a low soffit in a high-traffic area becomes a hazard.
Basement Framing Around HVAC Ducts
HVAC ductwork requires understanding clearance rules and structural support. Ducts expand and contract with temperature changes, and airflow performance depends on adequate space around them.
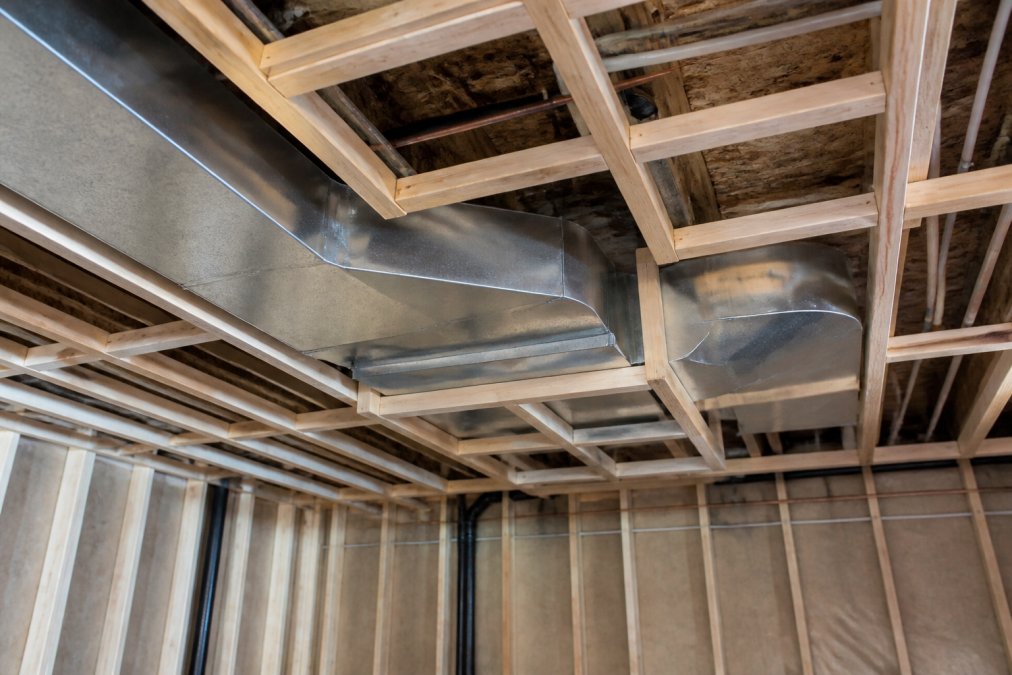
Building code requires minimum clearance around ducts for inspection and maintenance. Plan for a removable panel or access door where the duct connects to equipment or where filters sit.
The standard approach is to build a soffit that runs the length of the ductwork using 2×4 lumber. Space the frame members so the duct sits inside without touching wood, leaving at least 25-50 mm (1-2 inches) of clearance on all sides for airflow and thermal expansion (ASHRAE standards and guidelines).
Secure the soffit frame to the joists above using lag bolts or joist hangers. The frame carries its own weight plus drywall, so it needs proper structural support, don’t nail it to the duct itself.
Install vapor barrier before adding insulation to prevent condensation from forming on the duct. Use 6-mil polyethylene or a dedicated vapor barrier product, sealing all seams with tape. Then add insulation, typically fiberglass batts or rigid foam, leaving access panels uninsulated so they remain lightweight and easy to remove. Finally, drywall the soffit and finish it to match your ceiling.
How to Box in Basement Support Posts
Support columns don’t have to dominate your basement. Boxing them in makes them disappear visually while protecting them from damage.
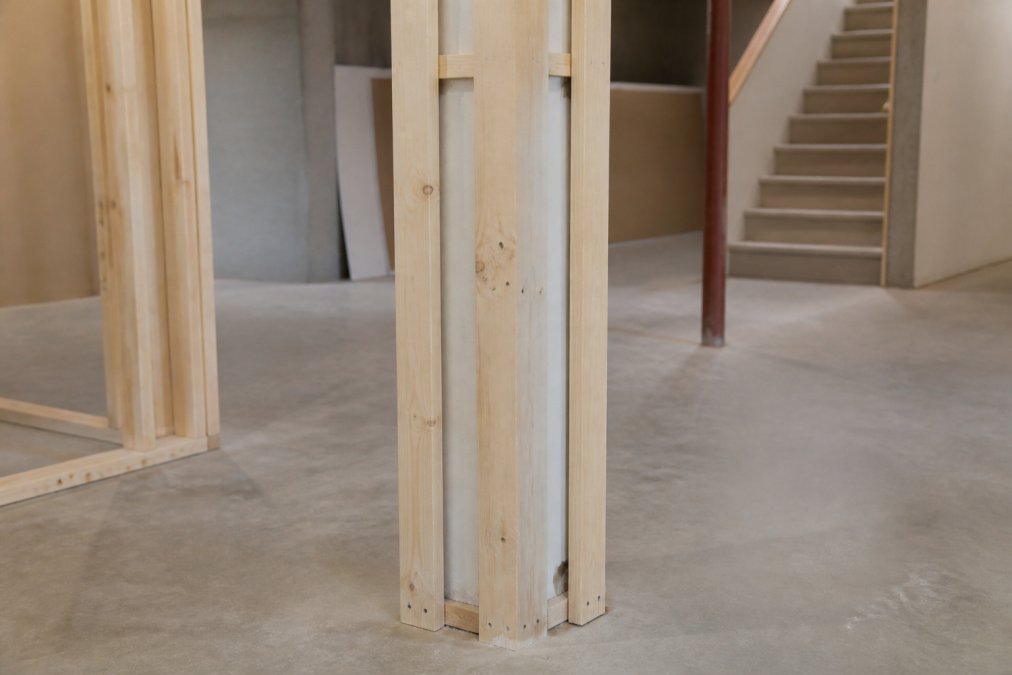
Measure the column carefully, most basement support posts are 4×4 or 6×6 steel or wood. Build a frame around it using 2×4 lumber, leaving a small gap (about 13 mm or 1/2 inch) between the frame and the column. This gap prevents the frame from bearing load and allows the column to settle independently.
Use shims to level and plumb the frame. The bottom plate sits on the basement floor, the top plate connects to the joist above. Secure the top plate with lag bolts into the joist. The bottom plate can be anchored to the floor with concrete anchors or simply sit in place.
Install furring strips on the inside faces of the frame to give drywall something to fasten to. Space furring 400 mm (16 inches) on center. Before drywall, run electrical conduit and low-voltage cabling on the furring if needed. Seal gaps between the frame and column with fire-blocking material, typically mineral wool or caulk. Then drywall the frame and finish it.
Managing Plumbing and Gas Lines
Plumbing stacks and gas lines are often more problematic than ducts because they’re vertical and harder to work around. A 75 mm (3-inch) plumbing stack running through your planned bedroom wall forces a redesign.
For plumbing, build the wall slightly offset from the stack, leaving it exposed or boxing it separately with removable access panels. A 2×6 wall gives you extra depth to work with. Run the stack up the inside of the wall cavity if code permits, or frame a small chase around it.
Gas lines need clearance from combustible materials and must remain accessible for inspection. Most inspectors require at least 25 mm (1 inch) of clearance on all sides (Natural Resources Canada guidance on gas appliance installation). Frame a chase around the gas line, a small vertical cavity that runs from the basement to the floor above, or relocate the line if possible, though this requires a licensed plumber and adds cost.
Never assume you can hide plumbing or gas lines. Always consult the building code and your local inspector before framing.
Building Code Requirements for Basement Renovations
Basements have specific code requirements that differ from above-grade rooms. Egress, ceiling height, moisture protection, and ventilation are all regulated.
Egress is critical. Bedrooms must have a second exit, typically a window meeting minimum size requirements or a door to the exterior. If you’re planning a basement bedroom, you need egress, which often means installing a window well or exterior door.
Ceiling height in basements must be at least 2.1 metres (7 feet) clear in habitable rooms (National Building Code of Canada). Ducts, pipes, and other obstructions count toward ceiling height. If your basement has 2.29 metres (7.5 feet) of floor-to-joist clearance and you’re planning a 150 mm (6-inch) soffit, you’re left with 2.13 metres (7 feet) exactly. Measure carefully and plan accordingly.
Moisture control is non-negotiable. You must install a vapor barrier on the floor before finishing, and walls need moisture-resistant materials. Use moisture-resistant drywall or basement-specific products. Ensure your basement has drainage and that water isn’t entering from outside.
Electrical rough-in has basement-specific rules. Outlets often need GFCI protection. Work with a licensed electrician to ensure compliance.
Insulation, Vapor Barriers, and Moisture Control
Moisture is the silent killer of basement projects. Without proper vapor barriers and insulation, condensation forms, mold grows, and your finished basement becomes damp and uncomfortable.
Start with the floor. Before framing any walls, install a continuous vapor barrier across the entire basement floor. Overlap seams by at least 150 mm (6 inches) and tape them. This prevents ground moisture from wicking up into your framing and insulation.
For walls, install vapor barrier on the warm (interior) side of the insulation. This prevents warm, moist basement air from condensing inside the wall cavity.
Insulation choices matter in basements. Fiberglass batts absorb moisture and lose effectiveness when wet. Closed-cell spray foam or rigid foam boards are better choices because they resist moisture and provide a continuous thermal barrier.
For rim joists, use spray foam or rigid foam. This area is a major source of heat loss and condensation problems. Seal and insulate it completely.
Ensure your basement has drainage. If water is entering from outside, no amount of interior vapor barrier will solve the problem. Address exterior drainage first, grading, gutters, and foundation drainage. Once the basement is dry, interior moisture control becomes straightforward.
Drywall Installation and Access Panels
Drywall is the final visible layer, but it’s only as good as the framing underneath. In basements with obstructions, drywall installation requires planning around access panels and irregular framing.
Access panels are required for HVAC filter locations, plumbing shut-offs, electrical panels or junction boxes, gas line connections, and any utility needing regular maintenance or inspection. Build the frame for an access panel just like any other opening. Some contractors use hinged drywall panels that open like a door; others use removable panels that lift out.
Use moisture-resistant drywall in basements. Tape all seams and apply joint compound. Sand smooth and prime before painting. When finishing around irregular framing, take time with taping. Gaps and poor finishing look unprofessional and can trap moisture.
Common Mistakes to Avoid
Basement projects with obstructions fail most often because of planning mistakes made before framing starts.
The biggest mistake is underestimating ceiling height loss. A soffit for ductwork, insulation, and drywall can easily consume 300 mm (12 inches) of clearance. If your basement starts at 2.29 metres (7.5 feet), you’re left with 1.98 metres (6.5 feet), below code for habitable rooms. Measure twice and verify code requirements before committing to a layout.
Another common error is ignoring moisture. Homeowners finish a basement, and within months, condensation appears and mold spots show up. This is almost always because vapor barrier was incomplete or installed incorrectly.
Failing to plan access panels is another frequent mistake. Utilities need maintenance. If you box them in without access, you’ll eventually need to tear out drywall to reach them.
Improper support for soffits and boxed elements is also common. A soffit that sags or creaks is unsafe and looks bad. Use proper framing, adequate fasteners, and structural support.
Finally, many homeowners don’t consult building code or their local inspector until after framing is complete. By then, corrections are expensive. Get code questions answered before you start.
Finishing a basement with obstructions requires careful planning, code knowledge, and solid execution. By mapping your obstructions early, understanding clearance requirements, and building proper framing and moisture control, you transform constraints into a finished space that adds real value to your home.
If the complexity feels overwhelming, that’s exactly when to bring in experienced help. Mario Laflamme Contracting & Renovation Ltd specializes in basement renovations where obstructions are the norm, not the exception. Our team handles the planning, code compliance, and execution so your basement project stays on schedule and on budget. Contact us for a free consultation to discuss your basement layout and get a clear picture of what’s possible in your space.
Frequently Asked Questions
What are the building code requirements for basement ceiling height?
The National Building Code of Canada requires a minimum clear ceiling height of 2.1 metres (6’11”) in habitable basement spaces. This measurement is taken from the finished floor to the lowest point of the ceiling. Mechanical spaces housing furnaces or water heaters may have lower clearance.
Always verify local municipal bylaws, as some jurisdictions impose stricter requirements. Measure your space before framing to confirm you can meet code while working around obstructions like ducts and beams.
How do you maintain access to shut-off valves when finishing a basement?
Install removable access panels in front of water shut-off valves, electrical panels, and HVAC dampers. Frame a small box around the obstruction and attach a hinged or magnetic panel that matches your drywall finish. Leave at least 300 mm (12 inches) of clear space around the valve for operation.
Mark the location on your floor plan and consider labeling the panel so future owners know what’s behind it. This approach keeps your basement finished while preserving critical maintenance access.
Is it better to box in or drop the ceiling for basement obstructions?
Boxing in individual obstructions (ducts, posts, pipes) preserves ceiling height and costs less than dropping the entire ceiling. Box-ins work best for localized obstructions. Drop ceilings are better when multiple obstacles run across the space or when you need easy access for future maintenance. Drop ceilings also simplify running electrical and low-voltage wiring. Measure your available height first: if you’re already tight on clearance, boxing in is usually the only viable option.
What’s the best way to insulate around basement pipes?
Wrap hot water pipes with foam pipe insulation (13 mm to 25 mm thickness) to reduce heat loss and prevent condensation on cold water lines. Maintain at least 50 mm of airspace between insulation and framing for moisture control. Use fiberglass batts or rigid foam board around the pipe runs, ensuring the vapor barrier faces the warm side of the wall. In cold climates, insulating basement pipes also protects them from freezing. Avoid compressing insulation, as this reduces its effectiveness.
This article was written using GrandRanker
Table of Contents
Start With Project Goals and a Clear ScopeDefine Menu and Service RequirementsSet Measurable Renovation GoalsCommercial Kitchen…
Table of Contents
Diagnose Your Basement Moisture Before InsulatingIdentifying water intrusion sourcesMeasuring moisture levelsBest Insulation for…