
Signs You Need a Full Exterior Renovation
Table of Contents
- Warning Signs Your Exterior Renovation Can’t Wait
- Material-Specific Failure Signs Most Homeowners Miss
- Structural and Moisture Red Flags: Foundation, Windows, and Doors
- Energy Efficiency, Heat Loss, and Peeling Paint
- DIY Inspection Checklist: What to Check Before Calling Exterior Renovation Contractors in St Albert
- How Long Does an Exterior Renovation Take?
- Best Exterior Upgrades for Resale Value
- Frequently Asked Questions
Last Updated: September 26, 2026
Warning Signs Your Exterior Renovation Can’t Wait
Most homeowners wait too long to address exterior damage, and that delay is what turns a manageable repair into a full renovation. Knowing the signs you need a full exterior renovation early gives you time to plan, budget, and avoid emergency spending. This guide from Mario Laflamme Contracting & Renovation Ltd walks through the warning signs that matter, the material failures people overlook, and a practical DIY inspection checklist you can run this weekend.
An exterior renovation is the process of repairing or replacing the outer systems of a home, including siding, roofing, windows, doors, and foundation drainage. The key word is “systems.” One failing component rarely stays isolated for long.
Here’s what most guides get wrong: they treat each symptom as a standalone problem. In practice, water that gets past worn siding almost always shows up later as rotted sheathing, failed insulation, or a cracked foundation. The signs below tend to appear in clusters, and clusters are your signal that a full renovation makes more sense than patching.
Ignoring early warning signs rarely saves money. A small flashing repair handled promptly is far cheaper than replacing rotted sheathing and interior drywall months later.
Material-Specific Failure Signs Most Homeowners Miss
Different materials fail in different ways, and the failure pattern tells you how urgent the work is. Generic advice about “checking your siding” misses this entirely. Here’s what to look for by material.
Siding: Warping, Rot, and Skirting Gaps
Vinyl siding warps when trapped heat and moisture build behind it. Run your hand along the wall: if panels ripple or pull away from the sheathing, moisture is likely getting in.
Wood siding tells a different story. Look for soft spots, dark staining, and paint that blisters rather than peels. Rot usually starts at the bottom edges and around window trim, where water lingers.
Skirting gaps are the quiet one. On homes with exposed foundation skirting, gaps let in cold air, pests, and snow melt. Small gaps widen every freeze-thaw cycle.
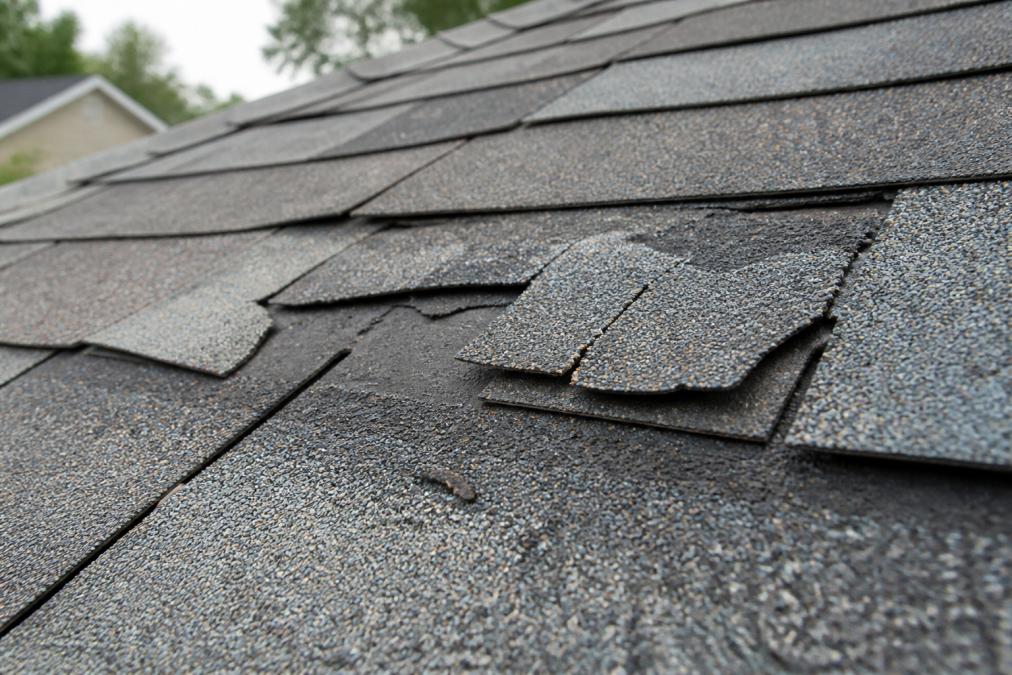
Roofing: Curling Shingles and Granule Loss
Curling shingles mean the asphalt is drying out and the roof is near the end of its service life. Check the south-facing slope first; that’s where sun exposure does the most damage.
Granule loss is easier to spot from the ground. Look for dark patches on the shingles and a buildup of grit in your eavestroughs. Once granules are gone, the mat underneath degrades fast.
Flashing is the third check.
Structural and Moisture Red Flags: Foundation, Windows, and Doors
Structural and moisture problems are the most expensive category, and they’re the ones homeowners most often misread. A single hairline crack in a poured foundation is usually cosmetic. What matters is the pattern.
Watch for these:
- Diagonal cracks at the corners of window and door openings, which suggest foundation settlement
- Sticking windows and doors that previously opened smoothly, a sign the frame has shifted
- Gaps around window seals that let in drafts, dust, and water
- Musty smells in the basement or crawlspace, which point to ongoing moisture
- Efflorescence (white chalky deposits) on foundation walls, left behind by water moving through concrete
Take dated photos of every crack you find and re-photograph them 60 days later. A crack that has visibly widened is a structural concern; one that looks identical is usually just settling.
Energy Efficiency, Heat Loss, and Peeling Paint
- Flaking or chalking on a sun-exposed wall is usually UV degradation of the coating. Scrape, prime, and repaint.
- Blistering or peeling in sheets points to moisture migration from inside the wall. Repainting without fixing the source guarantees a repeat.
- Peeling concentrated around windows, doors, and corners points to failed flashing or caulking, not the paint.
- Peeling at the bottom of a wall points to rising damp or splash-back from grade, often a drainage issue.
A few quick checks you can run yourself:
- Hold a lit incense stick near window and door frames on a windy day. Smoke that flutters sideways marks an air leak.
- Check attic insulation for dampness or compression. Compressed insulation has lost much of its R-value.
- Look at exterior caulking around joints. Cracked caulking is a five-minute fix now and a rotten frame later.
- On a cold morning, run your hand along interior walls at stud locations. A noticeably colder stripe is thermal bridging.
- Check the rim joist area in the basement. It’s one of the most common air-leak paths and one of the cheapest to seal.
If your heating bill jumped but your thermostat settings haven’t changed, the envelope is the first place to look, not the furnace. A service call on a working furnace won’t fix air leakage.
Energy upgrades also interact with the rest of the renovation. Adding exterior rigid insulation during a re-side is far cheaper than doing it as a standalone project later, because the siding is already off. Sequencing energy work into a full exterior renovation is one of the few ways to get a meaningful efficiency gain without paying twice for labor.
DIY Inspection Checklist: What to Check Before Calling Exterior Renovation Contractors in St Albert
Before you call anyone, run this checklist yourself. It takes about an hour and gives you a clear picture of what’s cosmetic versus what’s structural. It also makes your first conversation with exterior renovation contractors in St Albert far more productive.
- Walk the full perimeter and note any siding that is warped, loose, or stained
- Check eavestroughs for granule buildup and clear any debris
- Inspect roof flashing around chimneys, vents, and skylights
- Photograph all foundation cracks with a ruler for scale
- Open and close every exterior window and door; note any that stick
- Check window seals and exterior caulking for cracks or gaps
- Look for peeling or blistering paint, especially on south and west walls
- Check skirting and foundation gaps for daylight or drafts
- Smell the basement and crawlspace for mustiness
- Compare this year’s heating bills against last year’s
How Long Does an Exterior Renovation Take?
A full exterior renovation typically takes three to eight weeks of on-site work, depending on scope, material availability, and weather. Siding alone usually runs one to two weeks on a standard home. Roofing adds three to seven days. Windows and doors add another week or more if you’re replacing rather than repairing.
A realistic timeline looks like this:
| Phase | Typical Duration | What Happens |
|---|---|---|
| Assessment and scope | 1-2 weeks | Inspection, measurements, written quote |
| Planning and permits | 2-6 weeks | Material selection, scheduling, approvals |
| Siding and trim | 1-2 weeks | Removal, sheathing repair, installation |
| Roofing | 3-7 days | Tear-off, flashing, shingles |
| Windows and doors | 1-2 weeks | Removal, framing, sealing, trim |
| Finishing and cleanup | 2-5 days | Caulking, paint touch-ups, site cleanup |
Best Exterior Upgrades for Resale Value
- Drainage and grading, move water away from the foundation.
- Roofing and flashing, stop water from above.
- Foundation and structural repairs, fix what’s moving.
- Siding and exterior insulation, the envelope.
- Windows and doors, the openings.
- Paint, trim, and cosmetic finishes, the visible layer.
- If the defect is structural or moisture-related, fix it. Buyers’ inspectors will find it, and the discount they demand usually exceeds your cost.
- If the defect is purely cosmetic, weigh it against your market. In a slow market, curb appeal matters more; in a hot market, buyers may overlook it.
- Bundle work that shares scaffolding, disposal, or labor. A re-side and a window replacement done together cost less than either done alone.
- Get a written scope and timeline before committing. Vague timelines are a warning sign on their own.
The highest-return exterior work is the work that solves a moisture or structural problem while improving appearance. Cosmetic-only upgrades deliver much less at resale, and upgrades done out of sequence can undermine the work you’ve already paid for.
One more consideration: a full exterior renovation is also an opportunity to correct problems that would otherwise recur. If you’re re-siding anyway, adding a proper weather-resistive barrier and flashing detail costs a fraction of doing it later. That’s the difference between a renovation that holds up and one that looks good for two seasons.
Frequently Asked Questions
What are the most common signs of siding failure?
Look for warping, cracking, loose panels, and rot near the bottom edges. Paint that peels every year or caulking that keeps failing points to moisture trapped behind the siding. If you can push a screwdriver into the wood trim and it sinks in, that section needs replacing. Skirting gaps and soft spots along the foundation line are also signs that a full exterior renovation may be needed rather than spot repairs.
How do I know if my roof needs a full replacement or just repairs?
Shingles that curl, lose granules, or show bald patches across large areas usually mean the roof is near the end of its service life. If leaks appear in more than one spot, or if the roof is over 20 years old, a full replacement is often the better investment. A professional assessment can confirm whether roofing repairs will last or if you are throwing money at a failing system.
How does a full exterior renovation impact property value?
A full exterior renovation improves curb appeal, which is the first thing buyers notice. Updated siding, a sound roof, and sealed windows and doors signal that the home has been maintained. That matters at resale because buyers factor in the cost of deferred repairs. The best exterior upgrades for resale value are the ones that fix visible damage and improve energy efficiency, since those are the items a home inspection will flag.
What are the biggest exterior renovation mistakes to avoid?
The most common mistakes are addressing only the visible damage, skipping a professional assessment, and choosing materials without considering the local climate. Painting over rot or replacing shingles without checking the underlayment leads to repeat problems. Also avoid planning the renovation without a realistic timeline or budget for surprises. A thorough inspection and a clear scope of work prevent most of these issues before they start.

Table of Contents
Kitchen Island vs Peninsula: Comparison at a GlanceWhat Is a Kitchen Island?Pros and Cons of Kitchen IslandsWhat Is a Kitchen…

Table of Contents
1. What Are Your Project Goals and Vision?2. What Is Your Realistic Budget and How Will You Finance It?3. Home Renovation Planning…