
Protect Furniture During Home Remodeling: A Step-by-Step Guide
Table of Contents
- Why Protecting Furniture Matters During Renovation
- How to Contain Dust During Remodeling
- Best Materials for Furniture Protection During Construction
- Moving and Storing Furniture During Construction
- Protecting Flooring and Surfaces From Damage
- Post-Renovation Cleaning Checklist
- Best Ways to Protect Furniture: Pre-Renovation Preparation
- Frequently Asked Questions
Last Updated: September 25, 2026
Why Protecting Furniture Matters During Renovation
Renovation dust doesn’t just settle on surfaces. It infiltrates everything. Drywall particles, sawdust, and fine construction debris work their way into upholstery, damage wood finishes, and scratch protective coatings on appliances. Once embedded, this dust becomes nearly impossible to remove completely.
Learning how to protect furniture during remodeling is a fraction of the cost of replacing it afterward.
When you protect furniture during remodeling, you’re not just preserving appearance. You’re maintaining the structural integrity of your investment. Fine particulate matter from sanding and demolition can damage wood grain, scratch glass, and degrade fabric. The right protective strategy prevents this damage before it happens.
Start your furniture protection plan before contractors arrive. The first day of work is when most dust escapes containment. Being proactive saves cleanup time and prevents damage from day one.
How to Contain Dust During Remodeling
Dust containment is the foundation of furniture protection during remodeling. Without it, even well-covered pieces get exposed to airborne particles that settle during and after work.
Creating a Dust-Free Zone
A dust-free zone isolates your renovation work from the rest of your home. This is where the ZipWall Dust Barrier System becomes valuable. The spring-loaded poles create floor-to-ceiling partitions using plastic sheeting, and they install without tools in minutes.
Here’s how to set up an effective dust-free zone:
- Identify the primary work area and any adjacent rooms
- Install barrier poles at doorways and open passages
- Seal gaps where plastic meets walls with heavy-duty tape
- Create negative air pressure by keeping doors closed during work
- Position shop vacuums near dust sources to capture debris at the origin
The key is creating a complete seal. Even small gaps allow fine dust to escape and settle on furniture throughout your home. Once your zone is established, most renovation dust stays contained within the work area.
Plastic sheeting alone won’t work without proper support. Wind from open windows or HVAC systems can push dust under loose plastic. Use painter’s tape or heavy-duty tape to seal all edges firmly to walls and door frames.
Sealing Off Work Areas
Beyond the primary dust-free zone, seal secondary barriers around furniture that can’t be moved. Use HDX Heavy Duty Plastic Sheeting to drape over built-in cabinets, shelving, and fixtures. Secure it with 3M ScotchBlue Painter’s Tape, which removes cleanly without damaging finishes.
Seal seams in plastic sheeting with Gorilla Tape for maximum protection. This double-thick adhesive holds on rough surfaces and creates a complete barrier against fine dust penetration.
For doorways between work zones and protected areas, install plastic curtains that contractors can pass through without breaking containment. This maintains the seal while allowing movement through the space.
Best Materials for Furniture Protection During Construction
The right materials make the difference between furniture that emerges pristine and furniture that requires professional cleaning. Each material serves a specific purpose in your protection strategy.
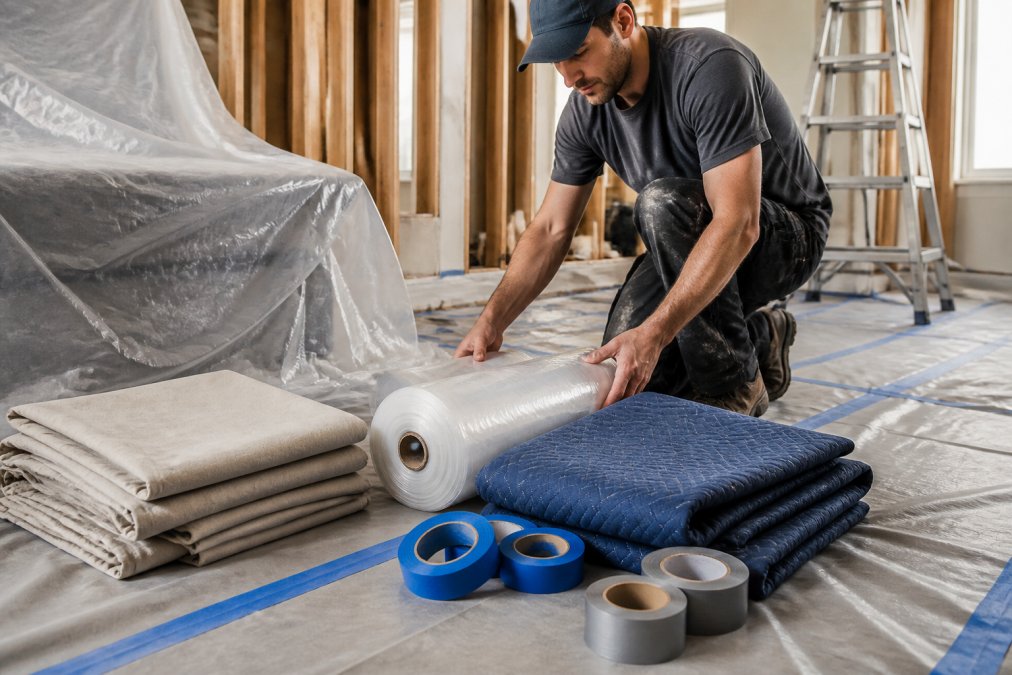
Plastic Sheeting and Drop Cloths
HDX Heavy Duty Plastic Sheeting is the workhorse of dust protection. It’s affordable, versatile, and waterproof. Use it to drape furniture, cover shelving, and seal off doorways. The material comes in various thicknesses; thicker mil ratings provide better protection but cost more.
Furniture Pads and Moving Blankets
U-Haul Furniture Pads provide superior protection compared to thin plastic. The quilted construction absorbs impact and prevents dents when furniture shifts during construction activity. These pads are reusable, making them cost-effective for multiple projects.
Protective Coverings for Delicate Materials
Delicate materials require additional consideration. Upholstered furniture benefits from a two-layer approach: furniture pads underneath for impact protection, then plastic sheeting over the pads for dust containment. This combination protects against both physical damage and fine particulate matter.
Moving and Storing Furniture During Construction
The decision to move furniture off-site or protect it in place is not one-size-fits-all. It depends on project scope, material vulnerability, available space, and budget. Understanding the trade-offs between these approaches prevents costly mistakes.
On-Site Protection vs. Off-Site Storage: Decision Framework
On-site protection works best when:
- Your renovation is contained to one area (kitchen, bathroom, single room)
- You have a sealed room or protected staging area away from active work zones
- Furniture pieces are sturdy, less valuable, or standard upholstery
- You need frequent access to items during the project
- Moving costs exceed the value of the furniture
Off-site storage becomes necessary when:
- Renovation spans multiple floors or the entire home
- Furniture includes delicate materials (antique wood, leather, velvet, silk)
- Heavy demolition or asbestos abatement is occurring
- The project timeline exceeds 4-6 weeks
- Your HVAC system cannot be adequately sealed or filtered
- High-value pieces warrant professional-grade protection
Climate-Controlled Storage: Protection Standards
If you move furniture off-site, climate control is not optional, it is essential. Uncontrolled storage environments create conditions that damage furniture as severely as renovation dust.
Temperature and humidity fluctuations cause:
- Wood frames to warp, crack, or split
- Veneer to separate from substrates
- Leather to shrink, crack, or develop mildew
- Upholstery seams to weaken as fabric expands and contracts
- Finish checking (fine surface cracks) on lacquered or varnished pieces
Professional climate-controlled storage maintains:
- Temperature between 15-21°C year-round
- Relative humidity between 40-55%
- Air filtration to prevent dust accumulation
- Protection from pests and moisture intrusion
Budget Comparison: DIY On-Site vs. Professional Moving and Storage
Calculate the full cost before deciding:
On-site protection (DIY approach):
- Plastic sheeting, tape, furniture pads: $150-$400
- Shop vacuum rental (if needed): $50-$100 per week
- Your labour for wrapping and setup: 4-8 hours
- Post-renovation deep cleaning labour: 6-12 hours
- Risk: Dust damage to high-value pieces if containment fails
Professional moving and climate-controlled storage:
- Full-service moving (packing, transport, storage): $2,000-$6,000 for a typical home
- Monthly storage fees: $200-$500 depending on volume and facility
- Professional wrapping protects against physical damage and dust
- Climate control prevents material degradation
- Insurance coverage typically included
For projects under 4 weeks with contained work areas, on-site protection is cost-effective. For whole-home renovations or projects involving delicate materials, professional storage often costs less than replacing or refinishing damaged furniture afterward.
On-Site Staging: Creating a Protected Furniture Zone
If you keep furniture on-site, designate a protected staging area outside the primary work zone. This area should:
- Be in a room with a door that closes completely
- Have plastic sheeting sealed over all air vents and returns
- Be positioned on the opposite side of the home from demolition work
- Have windows kept closed during active construction phases
- Include a dehumidifier if the room feels damp or if humidity exceeds 55%
For high-value, delicate, or antique furniture, professional climate-controlled storage during renovation is insurance against damage that protective coverings alone cannot prevent. For standard pieces in contained projects, on-site staging with proper sealing is usually sufficient and more economical.
Protecting Flooring and Surfaces From Damage
Flooring takes a beating during renovation. Contractors track debris, move heavy equipment, and create impact damage from dropped tools. Protecting floors prevents costly repairs after your project ends.
Post-Renovation Cleaning Checklist
Renovation cleanup starts before contractors leave. Dust settles everywhere, and the longer it sits, the more it bonds to surfaces. A systematic cleaning approach removes dust efficiently and prevents damage from fine particles.
Your post-renovation cleaning sequence:
- Use a Ridgid Shop Vacuum to capture heavy debris first
- Wipe all horizontal surfaces with damp cloths to capture fine dust
- Clean furniture wrapping and protective coverings before removing them
- Vacuum all flooring, including under protection materials
- Wipe down walls and baseboards where dust has settled
- Deep clean HVAC filters and return air vents
- Wash windows and glass surfaces last
Best Ways to Protect Furniture: Pre-Renovation Preparation
Preparation before work begins determines how much protection you’ll actually need. A thoughtful pre-renovation strategy reduces damage risk significantly.
Frequently Asked Questions
What’s the best way to protect furniture during renovations?
The most effective approach combines multiple layers of protection. Use plastic sheeting or heavy-duty drop cloths to drape over furniture, secure them with painter’s tape, and place furniture pads underneath for cushioning. For delicate upholstery, quilted moving blankets offer superior protection against fine drywall dust and debris.
For items you can move, store them in sealed plastic totes or in a climate-controlled area away from the renovation zone. Combining dust containment barriers with physical coverings gives you the best protection.
How do I contain dust during remodeling to protect my furniture?
Create a dust containment barrier using plastic sheeting secured with painter’s tape around doorways and openings. Install temporary walls using spring-loaded pole systems like ZipWall to isolate the work area completely. Seal seams in plastic with heavy-duty tape to prevent dust migration.
Run air filtration equipment to capture fine particulate matter at the source, and maintain proper ventilation to direct dust away from protected furniture. Close doors to other rooms and use weather stripping on door frames for additional protection.
Should I move my furniture out during a kitchen or bathroom renovation?
Moving furniture out is ideal if you have storage space available, especially for valuable or delicate pieces. Climate-controlled storage protects against moisture and temperature fluctuations that can damage wood and upholstery. However, if moving isn’t possible, protective coverings and dust containment barriers can be equally effective when applied correctly.
For kitchens and bathrooms specifically, moving dining tables, bar stools, and other nearby pieces prevents them from accumulating fine dust and construction debris during the demolition and finishing phases.
What should my post-renovation cleaning checklist include?
Start with a dry pass: vacuum all surfaces with a shop vacuum equipped with fine dust filters, then remove plastic sheeting carefully to avoid spreading dust. Wipe down furniture with microfiber cloths, starting from the highest surfaces and working downward. Clean flooring thoroughly, hardwood may need specialized cleaning products to remove adhesive residue or sealant overspray.
Check upholstery for embedded dust and consider professional steam cleaning for fabric. Finally, wipe baseboards, door frames, and light fixtures. Allow air to circulate for 24-48 hours to clear any remaining particulate matter before fully restocking the space.
Protecting furniture during home remodeling requires planning, the right materials, and systematic execution. When contractors arrive without furniture protection in place, dust damage becomes nearly inevitable. Mario Laflamme Contracting & Renovation Ltd helps homeowners manage every phase of renovation, including furniture protection strategies tailored to your specific project.
Get a free consultation to discuss how we can protect your investment while delivering the renovation you envision.
Table of Contents
Diagnose Your Basement Moisture Before InsulatingIdentifying water intrusion sourcesMeasuring moisture levelsBest Insulation for…
Table of Contents
1. Optimize Your Small Kitchen Layout Ideas for Better FlowGalley Layouts for Narrow SpacesL-Shaped ConfigurationsSingle-Wall…