
DIY Exterior Home Inspection Checklist: 7 Areas to Check
Last Updated: October 30, 2026
Quick Summary
A DIY exterior home inspection is a structured walk-around from the ground that lets you record visible problems with the outside of your house before they become expensive repairs. Walk the full perimeter, photograph everything, note locations, and use binoculars for the roof, chimney and upper walls. Do not climb onto the roof, lean a ladder against siding, or open electrical panels.
- Record four things at each foundation crack: location, orientation, width, and whether the width changes.
- A crack you can fit a coin into is a reasonable threshold for calling someone.
- Test drainage on a dry day by running a garden hose into the gutter at the high end.
- Sort findings into three buckets: fix now, monitor, and plan ahead.
- Recheck the monitor list each season, and move a finding up a bucket if it has grown.
Table of Contents
- Start With Safety: What a DIY Exterior Inspection Can and Cannot Do
- Foundation and Structural Cracks: What to Look For
- A Roof Inspection Checklist for Homeowners Who Stay on the Ground
- Siding Inspection Checklist: Cladding, Paint, Brick and Stucco
- Windows, Doors and Exterior Caulking: Seals, Rot and Drafts
- Exterior Drainage Inspection: Gutters, Downspouts, Grading and Flashing
- How to Document and Prioritize What You Find
- Get a Printable Home Inspection Checklist and Book a Free Exterior Consultation
- Frequently Asked Questions
Start With Safety: What a DIY Exterior Inspection Can and Cannot Do
That last part matters. Most exterior failures start small and visible: a lifted shingle, a hairline crack, a bead of caulking pulling away from a frame. Catching them early is the whole point of an exterior inspection.
What a DIY pass cannot do is judge structural integrity, confirm whether a crack is cosmetic or active, or tell you if a roof has years left or months.
- Do: walk the full perimeter, photograph everything, note locations, check from a safe distance
- Do: use binoculars for the roof, chimney and upper walls
- Do not: climb onto the roof, lean a ladder against siding, or open electrical panels
- Do not: probe soft wood with a screwdriver or step onto anything you have not checked
If you spot something that looks beyond a simple repair, you can explore exterior renovation services to see what professional help covers.
Foundation and Structural Cracks: What to Look For
Foundation cracks are the finding homeowners worry about most and understand least.
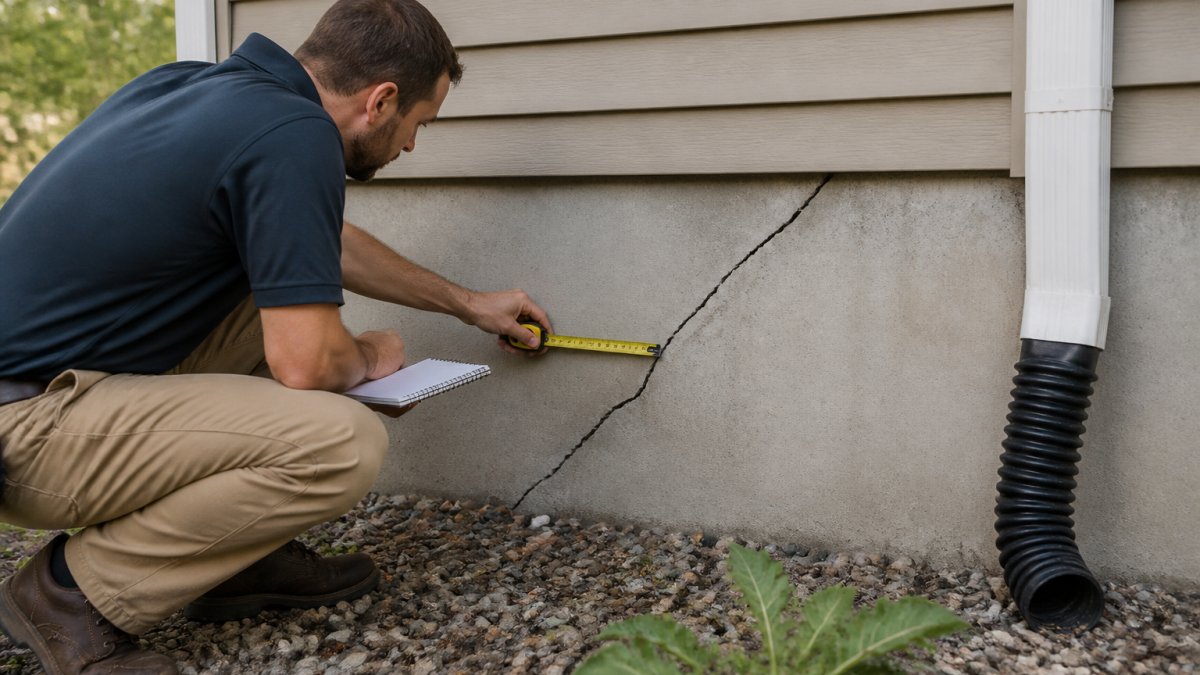
Start with a slow walk along the entire foundation line, not just the front. Carry a notepad, a pencil, a tape measure, and your phone.
What the patterns usually mean:
- Vertical hairline cracks in poured concrete are common and often relate to curing shrinkage. They are usually harmless unless they widen or leak.
- Diagonal cracks that step along mortar joints in block or brick foundations are more concerning. They often follow movement, and a stepped pattern that widens toward one end deserves a professional look.
- Horizontal cracks in a foundation wall are the pattern most practitioners treat as urgent, because they can indicate lateral pressure from soil or frost.
- Cracks wider than a hairline, roughly the width of a dime, are worth measuring and rechecking. A crack you can fit a coin into is a reasonable threshold for calling someone.
Width matters, but change matters more. A crack that has not moved in two years is a very different finding from one that grew since last spring.
Other foundation warning signs to record:
- Efflorescence, the white powder that signals moisture moving through concrete. Note where it appears and whether it returns after rain.
- Staining or dark patches that stay damp long after the surface should have dried.
- Spalling, where the surface has flaked or crumbled, often from freeze-thaw action.
- Gaps where the foundation meets the siding or brick, which can let water into the wall assembly.
- Soil piled above the siding line or mulch banked against the foundation, which holds moisture where it should drain away.
Do not probe cracks with a screwdriver or chisel to see how deep they go. You can widen a hairline crack into a real water entry point, and you will not learn anything a photo and a measurement would not tell you.
If you find a horizontal crack, a stepped crack that is widening, or any crack that is actively leaking, stop the DIY pass at that wall and arrange a professional assessment.
For the rest, your job is to build a record. Photograph each finding with something for scale, write the location in plain terms (“north wall, under the second window from the corner”), and note the date.
A Roof Inspection Checklist for Homeowners Who Stay on the Ground
A roof inspection checklist for homeowners works from the ground up: scan the roofline with binoculars, then check what the roof sheds onto.
Start at one corner and work around the house. On asphalt shingles, watch for curling edges, missing tabs, and dark patches where granules have worn away.
Then look down. Granules collecting in gutters or at downspout outlets are a signal the shingles are aging. So are shingle tabs on the lawn after a windstorm.
Flashing is the metal that seals roof-to-wall and roof-to-chimney joints, and it is where a lot of leaks begin.
If you are seeing multiple warning signs from the ground, it is worth understanding the signals that you need new roof siding before small issues turn into interior water damage.
Siding Inspection Checklist: Cladding, Paint, Brick and Stucco
A siding inspection checklist comes down to one question: is water getting behind the cladding? Everything you check serves that question.
For vinyl and wood siding, look for loose panels, warping, and paint that is blistering or peeling. Blistering paint usually means moisture is pushing from behind.
Run your eyes along the bottom edge of the siding where it meets the foundation.
Watch out: caulking over a rotten section of trim hides the problem for one season and makes it worse the next.
Once you have a list of siding defects, the next question is repair versus replacement, and this guide to siding replacement versus repair walks through how to decide.
Windows, Doors and Exterior Caulking: Seals, Rot and Drafts
Failed seals show up as fogging between panes, and failed caulking shows up as gaps you can see from a metre away.
Open and close every window and exterior door. They should move smoothly and latch firmly.
Then inspect the caulking line around each frame. Look for cracks, shrinkage, peeling, and sections that have pulled away from the wall.
Check the frames themselves for rot, especially on wood windows and door thresholds.
Air leaks are harder to see. If you find rot or failed seals around multiple openings, explore door and window renovation services to see what replacement planning involves.
Exterior Drainage Inspection: Gutters, Downspouts, Grading and Flashing
An exterior drainage inspection is the highest-value hour you will spend on your house.
The principle is simple: water should move from the roof, into the gutters, down the downspouts, and away from the foundation in one continuous path.
Gutters. Walk the full run of each gutter and look for sagging, separation at seams, and granule buildup.
Downspouts. This is where most drainage problems hide. Run water through each downspout with a garden hose and confirm it discharges well away from the foundation, not straight down beside it.
Grading. Walk the ground line on all four sides. The soil should slope away from the house, not toward it. Look for low spots where water can sit, soil that has settled against the foundation, and mulch or landscaping banked above the siding line. A common pattern is a bed that was built up over the years until it sits above the bottom of the siding, that is a direct path for water into the wall assembly.
Flashing. Flashing is the metal that seals roof-to-wall and roof-to-chimney joints, and it is where a lot of leaks begin.
Warning signs to record:
- Water staining or efflorescence on the foundation wall below a downspout outlet
- Pooling or damp soil at the base of the foundation after rain
- Gutters that overflow during a heavy rain rather than carrying water to the downspout
- Downspouts that discharge within a metre of the foundation
- Soil or mulch in contact with siding or trim
- Lifted or missing flashing at any roof-to-wall or roof-to-chimney joint
Test your drainage on a dry day with a garden hose. Run water into the gutter at the high end and watch where it goes. You will learn more in ten minutes than you will from a season of guessing.
Seasonal timing matters. In freeze-thaw climates, the highest-risk windows are spring melt and heavy fall rain. Check drainage before the ground freezes and again after the spring melt, when saturated soil and blocked downspouts show up as damp foundation walls. After any major storm, recheck the downspout outlets and the grading on the windward side of the house.
How to Document and Prioritize What You Find
Document first, decide second. A photo, a location and a date turn a vague worry into something a contractor can act on.
Use a simple system. Walk the house clockwise, number each finding, and photograph it with something for scale. Note the location in plain terms: “north wall, under second window from the corner.”
Then sort findings into three buckets:
| Priority | What It Looks Like | Action |
|---|---|---|
| Fix now | Active water entry, loose flashing, open gaps | Address within days |
| Monitor | Hairline cracks, early paint wear, minor caulking gaps | Photograph, recheck in 3 months |
| Plan ahead | Aging shingles, worn siding, older windows | Budget for next season |
Recheck the monitor list each season. If a finding has grown, it moves up a bucket. If your list keeps growing across multiple areas, it may be worth reading about the signs you need a full exterior renovation to see whether the issues add up to one bigger project.
Get a Printable Home Inspection Checklist and Book a Free Exterior Consultation
You now have the structure for a full exterior walk-around. Print this page, or copy the seven headings into a notebook and work through them one at a time, twice a year.
Some findings are yours to fix. Loose caulking, a downspout extension, a regraded patch of soil: those are weekend jobs. Others, like active foundation cracks, roof flashing failures and widespread rot, need a professional eye before they get worse.
Mario Laflamme Contracting & Renovation Ltd offers exterior upgrades such as siding, roofing, and fencing, along with comprehensive renovation solutions.
Get started with Mario Laflamme Contracting & Renovation Ltd and book a free consultation to turn your checklist into a plan.
Frequently Asked Questions
What should I check during a DIY exterior home inspection?
Work through seven areas in order: foundation cracks, roof condition from the ground, siding and cladding, windows and doors, gutters and downspouts, grading and drainage, and vegetation touching the structure. Carry binoculars for the roof, a flashlight, and your phone for photos. Note the location, size and date of every issue you find.
A DIY exterior home inspection catches visible problems early, but it does not replace a licensed professional inspection or a roofer’s assessment of the roof surface.
How often should I inspect my home’s exterior?
Do a full walk-around twice a year, in spring after the snow melts and in fall before winter. Check gutters and downspouts more often, roughly every three months, and after any major storm. In a climate with freeze-thaw cycles, spring matters most because winter damage shows up as new cracks, lifted caulking and shifted grading. Keep your notes from each round so you can compare and spot changes over time.
What are the signs of roof damage I can spot from the ground?
Look for curled, lifted or missing shingles, dark streaks, granules collecting in gutters or at downspout outlets, rusted or loose flashing around chimneys and skylights, and sagging along the roofline. Check soffits and fascia for rot, and look for daylight or water stains in the attic. Anything beyond these ground-level signs needs a roofer on the roof. Stay off it yourself, especially after rain or frost.
How do I check my home’s grading and drainage?
Walk the perimeter after rain and watch where water pools. Soil should slope away from the foundation, and downspouts should discharge well clear of the wall. Look for standing water, soggy patches, efflorescence or white staining on the foundation, and soil that has settled back toward the house. Extend downspouts if water lands within a metre of the foundation. Persistent pooling or water in the basement warrants a professional exterior drainage inspection.
When should I call a professional instead of inspecting an issue myself?
Call a professional for anything on the roof surface, cracks wider than a pencil, bowing or bulging walls, water entering the basement, rotten structural wood, or electrical and gas components. Also call when you cannot identify the cause of a problem or when a repair involves cutting into the building envelope. A contractor can confirm whether you need one repair or a larger exterior upgrade, such as siding and roofing together.

Last Updated: November 4, 2026
Quick Summary
Cold-climate siding maintenance means washing panels annually, checking and renewing caulking, clearing…

Last Updated: November 3, 2026
Quick Summary
Low-flow toilets, faucets and showerheads are the bathroom upgrades that save the most water, cutting…